
General Help
Get information about our website or Droom services

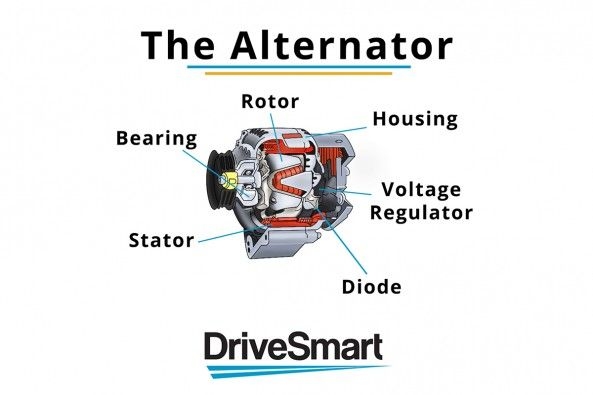
The 'Alternator' is one of the most significant and substantial elements in a vehicle. Not just the heavy trucks and buses, but it plays a pivotal role in cars, SUVs and 2-wheelers. For all of you asking, the Alternator is responsible for sending the power from the engine to charge the battery of a vehicle.
It also shoulders the responsibility of operating the electronics of the battery. Now, the question arises is when should you change the alternator of your vehicle? Well, the answer is pretty simple and clear: When the alternator doesn't deliver an adequate amount of current to recharge the battery, you should change it immediately. A few basic symptoms of a worn out alternator are low horn sound, dimming headlamps and subdued interior lights.
The alternator replacement cost at a company authorized workshop or at a local mechanic shop is somewhere around 700-1000 bucks. Furthermore, the professionals at the workshop will keep your vehicle with them for at least half a day, depending upon their work schedule. However, you can save both the money and the time if you carry out the alternator replacement process, all by yourself. How?, you will ask. Well, just follow the simple steps mentioned below and discover it yourself (DIY):
1. First things first, park the vehicle on an even surface to avoid any mishaps. Apply the handbrake/ electronic parking brake so that the vehicle doesn't move at all. The safety of an individual is equally important as that of the vehicle.
2. Unhook the bonnet and disengage the cords of the battery. Now, look for the socket near the negative (-) terminal. This one can be noticed fairly easily due to the big (-) sign. Once found, disengage the cable to remove the battery from the vehicle. Don't interfere with the positive (+) cord and keep it attached. The removal of the battery before replacing the alternator is suggested as it might cause damage to the vehicle or even the individual if left in active state due to an electric shock. There are numerous live wires around and you might get in direct contact with one. It is advisable to wear rubber/leather gloves.
3. Now, it is the time to disconnect the primary power cable from the alternator. It is quite thick in nature and can be easily recognised as it connects the battery to the alternator. Many vehicles also come with two belts namely tensioner and serpentine and hence, it is essential to loosen both of these before mounting a new alternator.
4. This is the penultimate step and it involves removing the safety clip which is attached with the wiring harness. Just so you know, it is the only cord present in the alternator apart from the main cable. Now, the alternator can be safely pulled out of the bonnet. However, before inserting the new alternator, you need to compare it to the old one to ensure both are similar.
5. After thoroughly inspecting the new alternator and comparing it with the old one, you can mount it with the help of bolts. Put the tensioner and serpentine belts back to their place. Reattach the power cable and safety clips. Reconnect the battery with the negative (-) terminal. There you go, you have successfully replaced the alternator. The tools needed to carry out this whole exercise are screwdriver, gloves, voltmeter, rags and a fresh alternator.
Read Also: Hero HF 100 Launched at Rs 49,400


